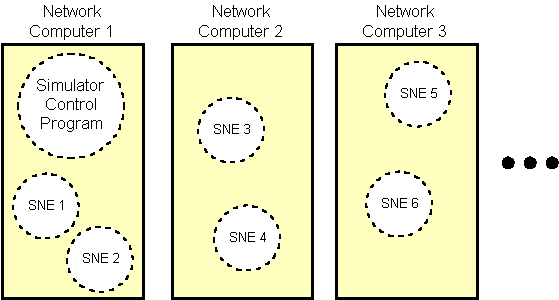
The simulated network, or "Simulated Network Environment", is used to simulate a network consisting of network elements, which may be printers, routers, bridges, switches, computer workstations, toasters, or anything else that can be plugged into the network and has some "smarts" built in. "Smarts" in this case refers to the ability to run code internally, so the network element must have a CPU with memory and some kind of operating system (anything from ROM based and very basic to high-end OS's, like computers running UNIX), as the capability to ship and receive code to and from other network elements. Currently, the vision for the code mobility infrastructure is a Java Virtual Machine (JVM) which would run inside of these network elements. The JVM would be running a Netlet Daemon, which would be responsible for receiving, instantiating and controlling the operation of Netlets and other mobile code. An example Simulated Network Environment is shown in the diagram below.
Currently, the Simulated Network Environment in composed of networked computers, which have one or more JVMs running (shown as dotted lines in the above diagram). The Simulated Network Elements (SNE) are analogous to the Network Elements (NE) discussed previously. Each SNE simulates the behaviour of its corresponding NE. All of these SNEs are received, instantiated and controlled by corresponding Netlet Daemons. In order to control the SNE, it is necessary to have an application that can communicate with the SNE using an established protocol. It is also desirable for this application to display information about the SNE, and to have the capability of allowing a user to modify the SNE, or the data that it contains. To this end, the Simulator Control Program was developed.
The Simulator Control Program (SCP) provides the following functions:
The use of the SCP will be illustrated through a simple tutorial. The user will create, link, modify local and remote data, and destroy a SNE. By the end of the tutorial the user should be familiar with the operation of the SCP, and with its role in the Simulated Network Environment.
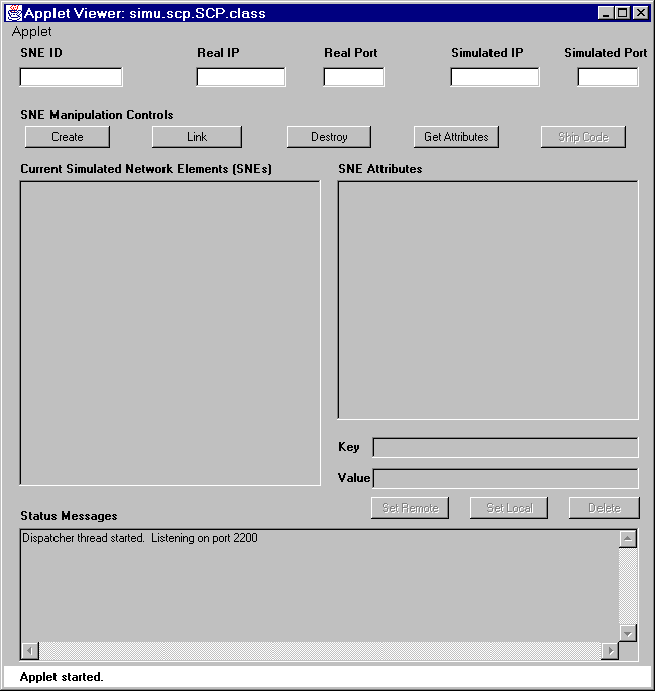
The above screen snapshot shows the basic layout of the SCP. As you can see from the title, it a Java Applet. An applet is similar to an application, except that it is event-driven, meaning that many of the controls (buttons, lists, etc.) must be activated by clicking or typing in order to get the applet to do something.
The top part of the applet window shows the SNE fields, consisting of SNE ID, Real IP, Real Port, Simulated IP and Simulated Port fields. These fields are important to the operating of SNEs, and all must be filled in before a SNE is created.
The middle part of the applet, or the "SNE Manipulation Controls" section, contains the buttons that control the creation, linking, deletion and attributes retrieval functions of the SCP. Note that there is a "Ship Code" which is grayed out on the far right of the button row. This button currently does nothing. It may be used in future versions of the SCP to ship code to SNEs.
Below these controls are two list boxes. The left-hand list box shows the current SNEs, which is a list of SNEs with SNE ID, Real IP and Real Port (also known as listener port) information shown on each line. The right-hand list box shows the attributes for the SNE. Below this list box are fields and buttons for setting and deleting remote and local attributes.
Finally, the bottom text area shows status and error messages which are generated by the SCP in response to user commands and events from the external network. The first message that will always appear in the Status Messages text area indicates that the Dispatcher thread has been started, and is listening for incoming communication requests on a certain port.
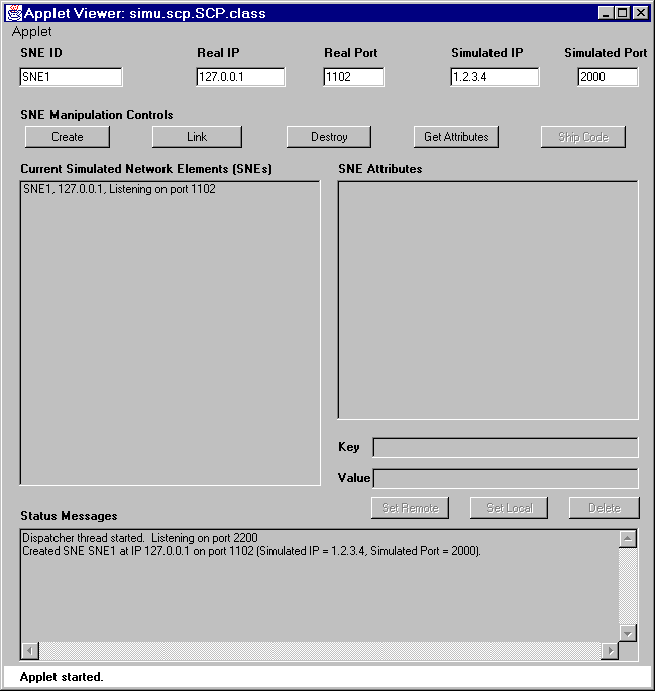
The above diagram shows the steps that are involved in creating a SNE. First, all of the SNE fields at the top of the SCP applet window must be filled in. A list of each field with description of its meaning is shown in the table below.
| SNE ID | The unique SNE identifier. This may be a number or text, but must be unique. It's used to identify the SNE in the SNE database (SNED). |
| Real IP | The real IP address on which the SNE will be listening for communication requests. Remember that in the Simulated Network Environment, there may be many SNEs on a single computer, so this field, combined with the Real Port field, provides a unique address where each SNE can be located. |
| Real Port | The real port number on which the SNE will be listening for communication requests. |
| Simulated IP | The simulated IP address for the SNE. Recall that each SNE is simulating a real network element (NE). A network element is a discrete component, like a router or printer, so something must be used to differentiate a SNE that may be running in conjunction with other SNEs on a single workstation. A unique Simulated IP address for each SNE will make it seem like there are many discrete NEs on the network, each with their own unique IP address, when they may in reality all be running on a single computer. |
| Simulated Port | The Simulated Port number for the SNE (see Simulated IP description above). |
Once the information has been entered into the fields, the Create button is clicked to create the SNE. Note that the creation step simply creates an entry for the SNE with all provided information in the SNE database, which is local to the SCP. Clicking the Create button will not result in a SNE thread being spawned in a Java Virtual Machine (JVM) on a remote host. Thus it is important to remember that the SNE itself must be manually instantiated, and the Create function of the SCP is only used to "register" the SNE once it has been instantiated.
Once the Create button has been clicked, the SNE entry information
appears in the Current SNEs list box, and a creation status message
is printed in the Status Messages text area.
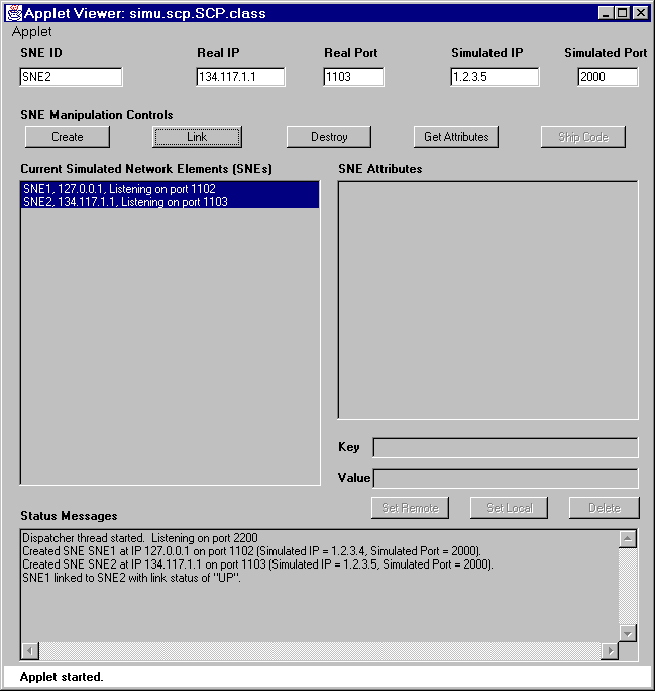
Since SNEs are supposed to simulate real network elements (NE), and these NEs may be physically linked to one or more NEs on the network, there must also be a way to link SNEs. The status of these simulated links can be "UP" or "DOWN", just like real links, and the link status can be set from the SCP using the Set Local button (more on this later).
The above diagram shows the result of linking two SNEs. SNE2 was created, and both SNEs were selected in the Current SNEs list box simply by clicking on them. This list box allows multiple SNEs to be selected without holding down any special keys. Once two SNEs have been selected, clicking the Link button will link them and the link status will initially be set to "UP". Just like SNEs themselves, the link information is stored in the SNE database locally in the SCP. SNEs or other programs running on the simulated network may query the SCP to obtain link status information for two SNEs.
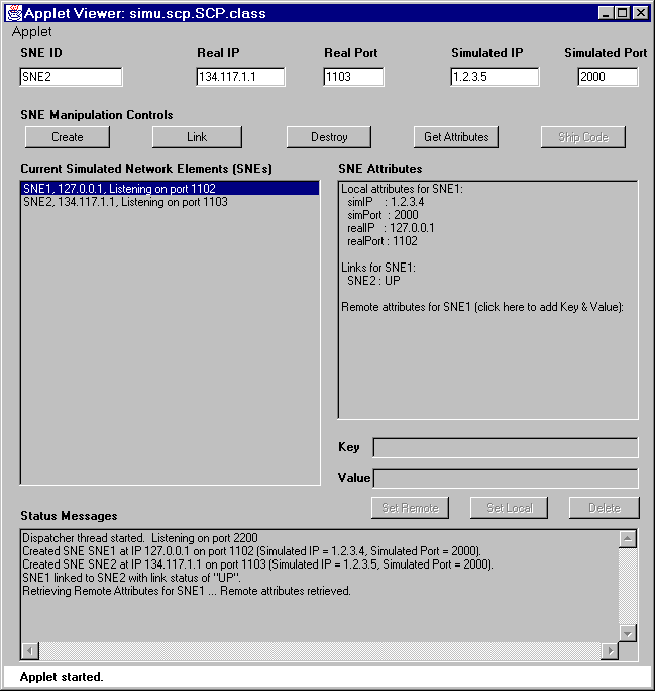
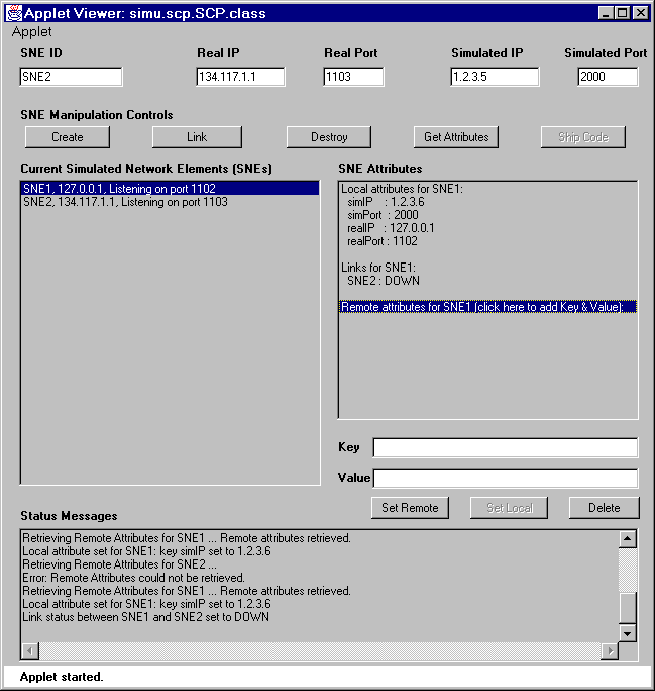
The above diagram shows the result of clicking the Get Attributes button for a selected SNE entry. This function will work if one and only one SNE is selected, otherwise an error message is printed in the Status Messages text area. A shortcut to clicking the Get Attributes button is to double-click on the SNE entry in the Current SNEs list box. This will display attributes for the SNE that was double-clicked.
The SNE Attributes list box is divided into three areas: local, links and remote. Each area is preceded by a title and followed by the attributes (key and value, separated by colons). Under each area, attributes may be added and deleted, making the list of attributes grow or shrink accordingly. The exception is the local area. The local attributes are pre-defined and can only be modified. No new attributes may be added, and none may be deleted.
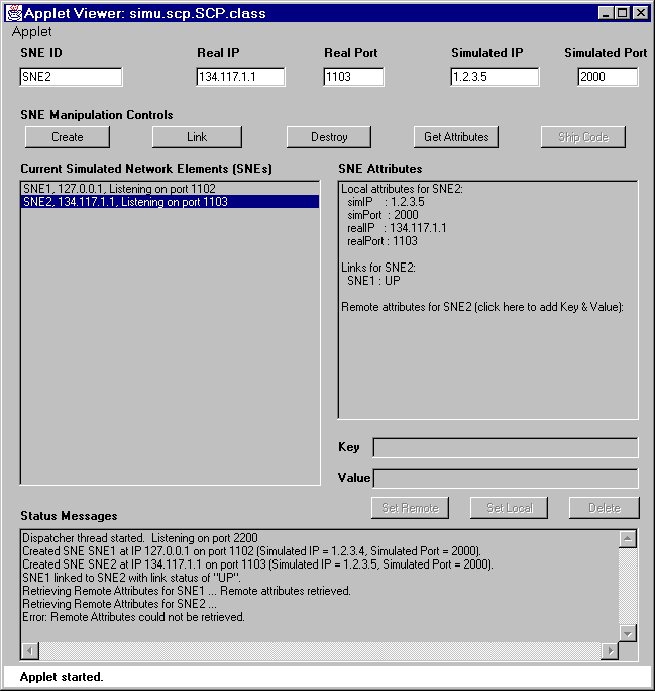
The remote attributes are different from local and link attributes,
in that they reside on a SNE, rather than in the SNE database
locally in the SCP. In order to get remote attributes, a communication
request is sent over the network to the SNE, and the remote attributes
are sent as a response. Because this requires network communication,
there is a possibility that the request to obtain remote attributes
will fail, due to network or SNE problems. The user is informed
of the status of the remote attribute retrieval by a message in
the Status Messages text area. The above diagram shows the message
that results from a successful remote attribute retrieval. The
diagram below shows the result of an unsuccessful remote attribute
retrieval.
The diagram below shows the process of setting a local attribute. To set attributes in general, simply click on the attribute in the SNE Attributes list box, set the appropriate key and value in the text fields below, and click on the appropriate set button.
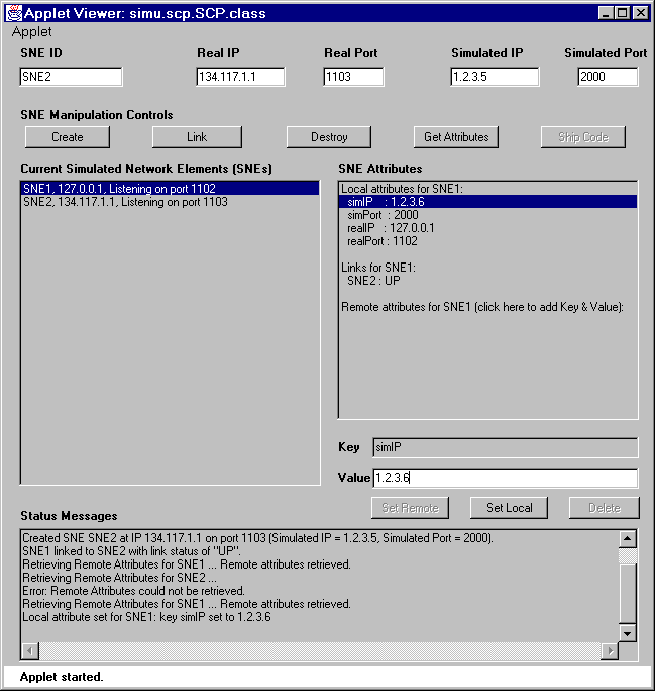
In this case, the simIP attribute was modified. The simIP field was clicked on, the value was changed to 1.2.3.6, and the Set Local button was clicked. An appropriate status message was printed in the Status Messages text area. Note that text fields and buttons that are not appropriate for the operation are disabled (seen as grayed out), so in this case the Key field, Set Remote and Delete buttons were disabled, since these functions are not allowed for the setting of local attributes.
The diagram below shows the result of setting the link status for the link between SNE1 and SNE2. To set link status, simply click on the link attribute in the SNE Attributes list box and change the value to either "UP" or "DOWN" (right now these are the only allowed values, although in future other values may be added) and click the Set Local button.
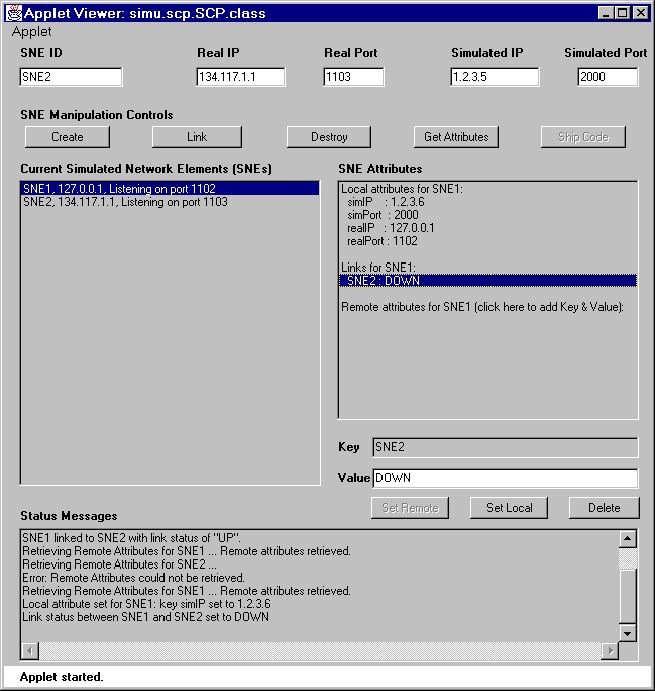
Note that links may also be deleted by selecting a link attribute and clicking on the Delete button. In both cases (setting or deleting), the changes are made to all affected SNEs. In this example the link status for SNE1 and SNE2 is changed to "DOWN", since the link affects both SNEs.
The diagram below shows the initial step in setting a new remote attribute. The Remote area title in the SNE Attributes list box, when clicked on, causes the Key and Value fields below to be enabled and cleared.
This allows a new Key and Value to be entered. Clicking the Set Remote button will cause a communication request to be made to the SNE. As with the case of getting remote attributes, a status message is printed in the Status Messages text area if the attribute was successfully sent to the SNE over the network, otherwise an error message is printed. Note that once the remote attributes are retrieved from the SNE, the SNE Attributes list box is blanked. This is to prevent automatic re-retrieval of remote attributes, which could result in delays due to network loading or if a long list of remote attributes is to be retrieved.
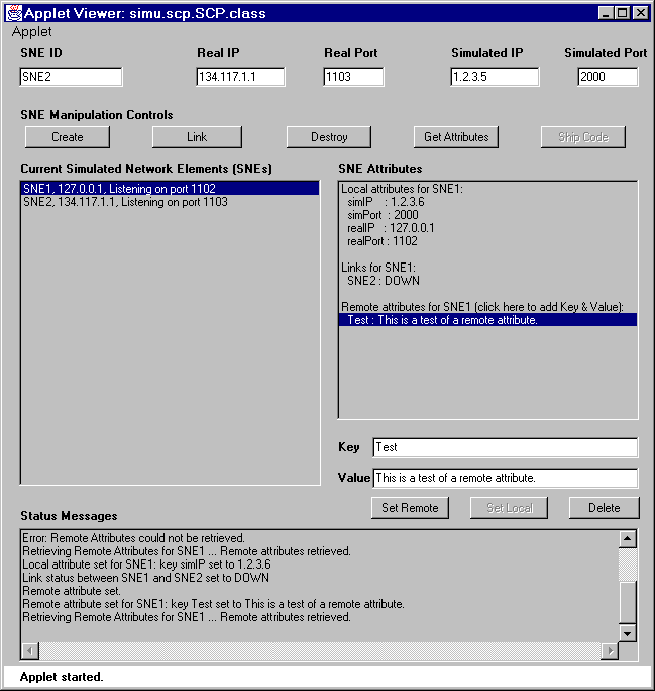
Note that once the first remote attribute has been set, it may be clicked on in the remote area of the SNE Attributes list box and modified or deleted as required.
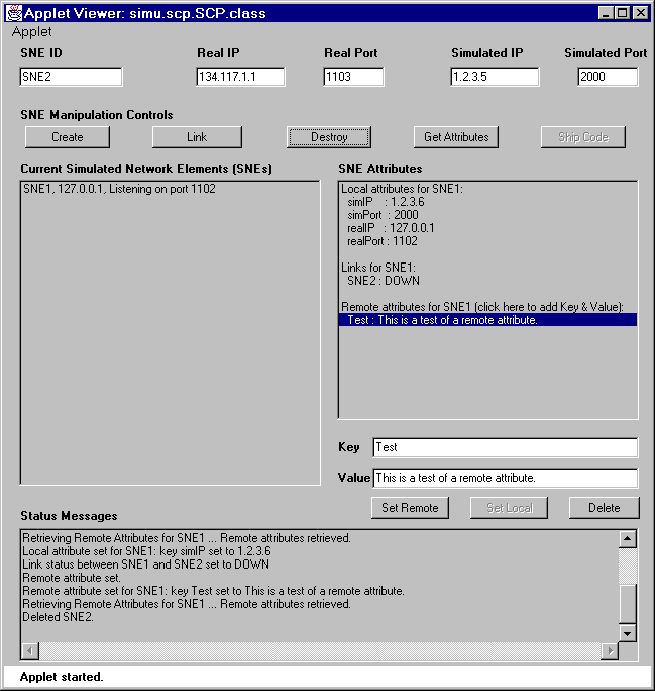
The diagram below shows the result of destroying a SNE. To destroy a SNE entry, simply select it by clicking on the appropriate SNE entry in the Current SNEs list box, and click the Destroy button. Care must be taken to ensure that only the desired SNE is selected. If more than one SNE is selected, all selected SNEs will be destroyed. The act of "destroying" a SNE entry simply removes it and all associated attributes from the SNE database, which is local to the SCP. Destroying a SNE entry does not physically kill the SNE running on the network.
The diagram below shows one way to quit the SCP. The Close item in the SCP applet title bar menu will close the SCP. All local SNE database entries will be lost. SNEs running on the network, as well as the remote attributes associated with the SNEs, will not be affected. To regain access to remote attributes for a SNE, simply re-run the SCP, Create the SNE entry with appropriate field values, and click the Get Attributes button.
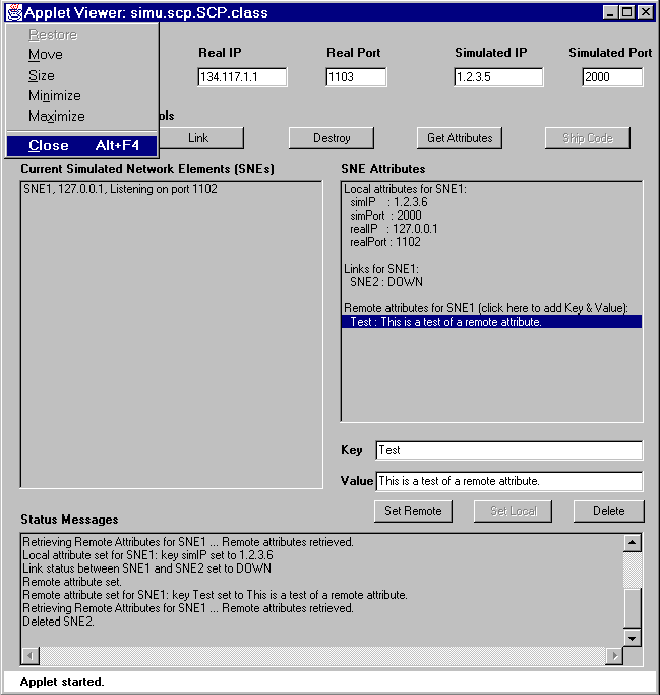
The SCP may also be closed by double-clicking on the title bar menu icon. Other methods of closing the SCP may exist, but these are dependent on the operating system.