Mobile Code Toolkit V1.6.2
Created by Tony White
 Getting
Started
Getting
Started
The Mobile Code Toolkit provides an infrastructure
for the use of mobile code in network management. A mobile code (also known
as a mobile agent) is a dynamic program that can travel through the network
and execute on several hosts in order to complete a certain task. To accommodate
and allow the mobile code to execute on a host, a daemon (i.e. an instance
of the class mct.RMINetletDaemon) must be installed on the host computer.
The mct.RMINetletDaemon is provided with security features in order to
guard from dangerous attacks by potentially malicious mobile code circulating
in the network.
This page has the following sections:
Requirements
-
An operating system that supports the Java Development Kit (JDK) version
JDK1.1.6. The JDK can be obtained from http://www.javasoft.com.
Use of the JDK compiler is strongly recommended.
-
For development, VisualAge for Java V1.0 or greater is highly recommended.
-
The computer has a TCP/IP stack installed and is connected to a network.
-
A Pentium class machine (166Mhz or greater) with 64Meg of memory.
-
5 Meg of disk space.
Installation
-
Download the package distribution available in zip format from the Experimental
Perpetuum Web page and save it in a temporary directory; e.g. Downloads.
-
Create a new subdirectory (e.g. c:\mct) into which the toolkit files will
be extracted.
-
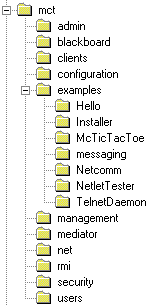
Use WinZip to extract the package
into the subdirectory that you just created on step 2. The package will
be exploded and yield the following tree setup which reflects the package
breakdown of the toolkit. Source (.java) and class (.class) files
are stored together in the same directory:
-
The mct directory contains the source and classes for the RMINetletDaemon.
-
The configuration directory contains example properties files for
mobile code daemons, facilitators and mobile code directories.
-
The admin directory contains source and classes that are required
for correct functioning of the toolkit and should not interest the user
unless he or she intends to modify the daemon or add new services to the
toolkit.
-
The blackboard directory contains the source and classes for a simple
blackboard application;
-
The clients directory contains the source and classes for WinMCTRMIClient.
The client application is used to inject mobile code into a running mobile
agent system.
-
The management directory contains source and classes for the management
interface that can be used to control the execution of mobile code running
on a mobile code daemon.
-
The mediator directory contains the source and classes that implement
the location service for mobile agents.
-
The net directory contains the source and classes that implement
the (deprecated) code transfer protocol.
-
The rmi directory contains the source and classes that implement
some simple RMI-enabled mobile code. It is of interest to users that need
to create RMI-enabled mobile agents.
-
The security directory contains the source and classes for the two
security managers written for the toolkit.
-
The users directory contains the source and classes that enable
development of end user mobile agent applications.
The examples directory provides a number of simple examples that exercise
aspects of the toolkit:
Examples
| Hello |
Prints text on the console window. |
| McTicTacToe |
Demonstrates that a mobile agent can maintain state carried along during
migration. This netlet plays tic-tac-toe, making a move and then migrates
to a new location, maintaining board positions as it does so. |
| NetletTester |
Demonstrates that mobile code can access the data implemented in a
Virtual Managed Component (VMC) container and is also capable of migration. |
| TelnetDaemon |
Demonstrates how to add a new service (extension) to the NetletDaemon.
In this case, the TelnetDaemon (server) can accept a telnet client application
and prompts for commands. |
| Installer |
Demonstrates how a piece of mobile code can install another mobile
code. For instance, an agent Netlet is used to install a VMC that does
not yet exist. The netlet will pull a mobile code from a local repository
and install it on the daemon. |
| NetComm |
Demonstrates simple communication between three mobile codes. |
| messaging |
Two applications are provided. First, a demonstration of interaction
between a simple blackboard and four communicating mobile agents. Second,
a simple send and receive application. |
-
Set the CLASSPATH environment variable.
CLASSPATH
Configuration
In order to use this package you should set your CLASSPATH environment
variable to include the classes defined in the toolkit. The CLASSPATH environment
variable should be extended with the directory chosen for installation;
e.g. \mct. It is recommended that you chose the default
directory for installation as the configuration files do not then need
to be edited before the demonstration applications can be run.
For example, if you are using version 1.1.6 of the JDK, then your CLASSPATH
should be set as:
-
setenv CLASSPATH .:/usr/local/jdk1.1.6/lib/classes.zip:$mctoolkit/ (UNIX)
-
set CLASSPATH= .;c:\jdk1.1.6\lib\classes.zip;%mctoolkit%\ (DOS, WIN 95/NT)
The environment variable %mctoolkit% or $mctoolkit refers to the actual
location of the package (e.g., c:\mct). So you may change directly the
variable %mctoolkit% with the c:\mct or you may keep using the entry as
mentioned above but set the environment variable %mctoolkit% first.
Run
Demo
Several programs have been written to demonstrate what this toolkit
can do. The demonstration assumes that a single machine is used and that
two mobile code daemons are running on it. It should be noted that this
version of the toolkit relies heavily on the use of RMI. In the instructions
below, a PC is assumed. Text in italics should be typed as written.
If you want to run the demonstration using the batch (.bat) files provided,
then install the software in c:\mct and c:\test\mct. Remove the c:\test\mct\examples
directory in order to ensure that you test the actual transfer of code
from the WinMCTRMIClient to the
running mobile code daemon.
In order to run the demonstration applications, you must:
-
Run the rmiregistry process.
-
Open a DOS console.
-
type: rmiregistry
-
Create a mobile code region (or
running mobile agent system).
-
Configuration files for a two daemon mobile agent system can be found in
%mctoolkit%\configuration; e.g. \mct\configuration.
-
Open a DOS console.
-
type: cd %mctoolkit%\configuration
-
type: start java mct.mediator.RemoteMediator
-
type: start java mct.RMINetletDaemon nd01.properties
-
type: start java mct.RMINetletDaemon nd02.properties
-
Run the WinMCTRMIClient
-
Using the DOS console created in step 2.
-
type: start java mct.clients.WinMCTRMIClient
Four batch files are also provided in the %mctoolkit%\configuration directory
in order to automate the above:
-
reg.bat [runs the rmiregistry]
-
rm.bat [runs the remote mediator]
-
nd01+nd02.bat [runs the two mobile code daemons, nd01 and nd02]
-
client.bat [runs the WinMCTRMIClient]
If the RMI registry, mobile code region and WinMCTRMIClient execute successfully,
you are now ready to view the simple demonstration applications. If the
"class not found" error is observed, it probably means that the CLASSPATH
environment variable is not set up correctly. Review the CLASSPATH
section. If the console windows associated with the mobile code daemons
contain "ERROR" or "WARNING" messages, it is likely that configuration
files have been placed in the wrong directories. Review the placement of
these files before continuing. If the default installation directory has
been chosen (\mct), the configuration files should be present in \mct\configuration.
If
not, you will have to edit the nd01.properties, nd02.properties, fac01.properties
and fac02.properties files to reflect the correct location of files in
the file system.
Running the examples
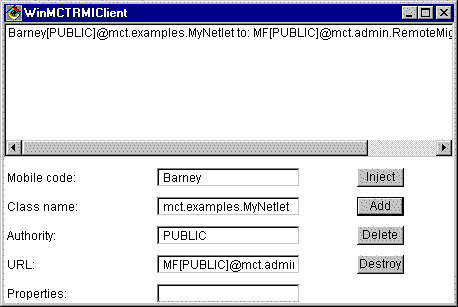
The WinMCTRMIClient,
shown above, is used to inject a mobile agent. In order to inject a mobile
agent, four pieces of information must be provided:
-
the mobile code name; e.g. Barney
-
the fully qualified class name; e.g.
mct.examples.MyNetlet
-
the authority of the mobile agent;
e.g. PUBLIC
-
the URL of the migration facility that
is to receive the injected mobile code.
When executed using the batch files provided, the WinMCTRMIClient
accesses the c:\mct\configuration\client.properties file. This file contains
definitions of mobile code that may be injected into a running mobile code
daemon, Using the two daemon example from above, the following tables provide
reasonable values for execution of the Hello, McTicTacToe,
TelnetDaemon,
NetletTester,
Netcomm
and Blackboard examples. Note that these entries
are present in the WinMCTRMIClient
mobile code list if the client.bat batch file is used to execute the client
application.
Hello
The netlet just prints on the console. The information that is displayed
relates to the state that is carried with the netlet. It's not interesting
per se, you should look at the onInit() and onStart() methods to see the
correspondence between console output and netlet behaviour.
| Mobile code |
MyHello |
| Class name |
mct.examples.Hello.Hello |
| URL |
MF01[PUBLIC]@mct.admin.RemoteMigrationFacilitator |
| Authority |
PUBLIC |
McTicTacToe
This netlet places a game of tic-tac-toe. It demonstrates that a netlet
can carry state with it as it migrates from one node to the next. Migration
continues until the game completes. On each migration the user should see
the state of the board displayed, and a message is written to the console
when the game completes.
| Mobile code |
MyTicTacToe |
| Class name |
mct.examples.McTicTacToe.McTicTacToe |
| URL |
MF01[PUBLIC]@mct.admin.RemoteMigrationFacilitator |
| Authority |
PUBLIC |
TelnetDaemon
This is a command line interpreter (i.e., an extension of the mobile
code daemon which is subclass of Extlet) that can be accessed via
a telnet application at port 9893. After you have sent the Hello
netlet as shown above, you may send this extension to the mobile code daemon
using the same procedure as sending the Hello netlet. Run a telnet
application and telnet to localhost at port 9893. Now you can control
the Hello netlet by calling its methods such as: start(), stop(),
and destroy(). After you destroy the Hello netlet, all traces of
the netlet will be removed from the mobile code daemon.
| Mobile code |
MyTelnetDaemon |
| Class name |
mct.examples.TelnetDaemon.TelnetDaemon |
| URL |
MF01[PUBLIC]@mct.admin.RemoteMigrationFacilitator |
| Authority |
PUBLIC |
NetletTester
This netlet demonstrates most of the capabilities of the package. It
will examine managed objects of a network element whose handler, SimpleVMC,
you first send. The netlet will also request that the mobile code daemon
migrate it to the default destination. This will migrate the netlet back
and forth from one daemon to another. However, the netlet has limited itself
to migrate only twice; therefore, you will see that the netlet visits each
daemon only once.
NetletTester also demonstrates that a netlet can
keep its persistent state that can be stored in its parameters.
| Mobile code |
MySimpleVMC |
| Class name |
mct.examples.NetletTester.SimpleVMC |
| URL |
MF01[PUBLIC]@mct.admin.RemoteMigrationFacilitator |
| Authority |
PUBLIC |
Having injected the SimpleVMC, the NetletTester is then injected.
| Mobile code |
MyNetletTester |
| Class name |
mct.examples.NetletTester.NetletTester |
| URL |
MF01[PUBLIC]@mct.admin.RemoteMigrationFacilitator |
| Authority |
PUBLIC |
NetComm
NOTE: The field "Mobile code" in this example
must
be set to "NCX where X=02,01 or 03".
A set of mobile code demonstrates simple inter-mobile code communication.
It consists of 3 mobile agents: i). NetComm01 that is used to send a message
to NetComm02, ii) NetComm02 that waits for a message from NetComm01, iii)
NetComm03 that sends a message to NetComm01. Use the injections sequence
02, 01 followed by 03 and observer the messages that are generated. Not,
try to inject the mobile code with different sequence to see how the communication
takes place. The NetComm example requires that a Mediator be running in
order to relay messages and record the locations of all the mobile code
in the mobile code region.
| Mobile code |
NCX where X = 02,01 or 03. |
| Class name |
mct.examples.Netcomm.NetCommX where X = 02,01 or 03. |
| URL |
MF01[PUBLIC]@mct.admin.RemoteMigrationFacilitator |
| Authority |
PUBLIC |
Blackboard
NOTE: The field "Mobile code" in this example
must
be set to "blackboard".
A blackboard is installed, followed by two netlets
(mct.examples.messaging.NotifyNetlet) that register for changes in the
value of the nhops key. A netlet (mct.examples.messaging.EnquireNetlet)
that asks the blackboard for the current value of nhops is then installed
followed by a netlet that posts a value of the number of times it has migrated
(nhops). The posting netlet (mct.examples.messaging.PostNetlet) triggers
the migration of the notified netlets when they receive a message from
the blackboard indicating that a new nhops value has been posted. Once
a notify or enquire netlet receives a message it migrates. After a post
netlet has posted its current value of "nhops" to the blackboard, it migrates.
| Mobile code |
blackboard |
| Class name |
mct.blackboard.MsgBlackBoard |
| URL |
MF01[PUBLIC]@mct.admin.RemoteMigrationFacilitator |
| Authority |
PUBLIC |
Now the notification netlets:
Note: The two notify netlets must have different
names, NN01 and NN02 are recommended.
Upon starting, the notification netlets register
with the blackboard for changes in nhops. As a posting netlet has yet to
be injected, they do nothing.
| Mobile code |
NNX X=01,02 |
| Class name |
mct.examples.messaging.NotifyNetlet |
| URL |
MFX[PUBLIC]@mct.admin.RemoteMigrationFacilitator X=01,02 |
| Authority |
PUBLIC |
Now the enquire netlet:
The enquire netlet will query the blackboard
immediately and begin to migrate. As there is no value of nhops on the
blackboard, it will be an unexpected response, as displayed on the Console.
| Mobile code |
EN01 |
| Class name |
mct.examples.messaging.EnquireNetlet |
| URL |
MF02[PUBLIC]@mct.admin.RemoteMigrationFacilitator |
| Authority |
PUBLIC |
Finally, the posting netlet:
The posting netlet puts a value of nhops on the
blackboard. The interaction of netlets is now complete as the blackboard
sends notification messages to the notification netlets which then migrate.
This cycle of posting, notification and subsequent migration continues
indefinitely.
| Mobile code |
PN01 |
| Class name |
mct.examples.messaging.PostNetlet |
| URL |
MF01[PUBLIC]@mct.admin.RemoteMigrationFacilitator |
| Authority |
PUBLIC |
After you finish running the entire demo, hopefully you will understand
some of what the package does. Now the challenge is yours to implement
mobile code applications that suit your needs. Constructing
a mobile agent provides more information of how your own mobile agent
might be constructed using the toolkit.
© Copyright 1998, Department of Systems and Computer Engineering,
Carleton University
Author: Tony White